A common problem with users of Windows XP or Vista users upgrading to Windows 7 is that their microphone stops working. If your already running Windows 7 and are experiencing a mic problem, this article still applies to you 🙂 In fact, most of the solutions below will work for any version of Windows.
Now, when I say microphone, I’m referring to any audio input device that is connected to you PC for recording audio – whether it’s for instant messengers (like MSN, Yahoo, etc), Google Talk, Skype, webcams, music recording software, etc.
This includes but is not limited to:
- USB Headphones or Headsets
- USB Webcam With Built-in Microphones
- 3.5mm Mini Plugs Style Desktop Microphones
- 3.5mm Mini Plugs Headphones (With Mic)
Common Windows Microphone Error Messages
Here are some common Windows audio-related error messages:
Error message: “Could not initialize volume meter. Please select a different audio input device.”
Mic symbol is greyed out with the error message: “Microphone not plugged in”.
Error message: “Windows can not execute Sndvol32.exe”.
Error message: “Error occurred during DirectPlay voice setup. Error code 0x80004005”.
Error message: “Windows cannot execute DpvSetup.exe – use add/remove program from control panel to install”.
Step-By-Step Microphone Solutions
Ok, before you start pulling your hair out, I always tell users to MAKE SURE your audio driver is up-to-date and you are running THE RIGHT VERSION for your PC. Missing, corrupt or incorrect drivers are the cause of most sound and microphone problems.
Step #1 – Update Your Audio Drivers
Download and run a free scan of DriverFinder and make sure your audio drivers are not out-dated.
If there is a problem with your Windows 7 audio driver, your microphone will never work and out-of-date drivers cause 90% of Window device errors. Using an automatic driver update software is the easy way to keep your computer device drivers working properly.
Step #2 – Test Your Audio Device On Another PC
If after updating your sound drivers your microphone is still not working, take your device and try plugging it into another computer (if you have access to one). This will eliminate the possibility that your actual hardware device is damaged. It’s not likely, but when troubleshooting any problem, you need to check some basics first.
Step #3 – Double Check Windows 7 Audio Settings
Make sure the microphone you are trying to use is set as your default audio input device in Windows. To check, follow the steps below:
- Go to “Start > Control Panel“
- Click on “Hardware and Sound > Sound > Manage audio devices“
- When the dialog box appears, click on the “Recording” tab
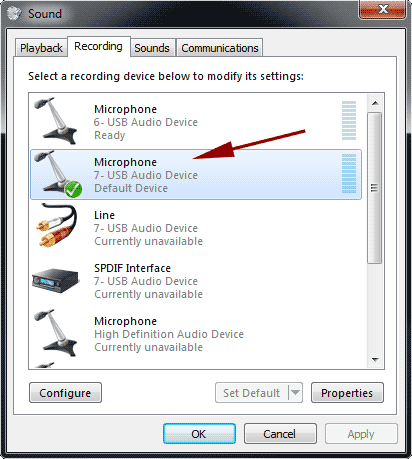
- Make sure the microphone you are trying to use has a green checkmark next to it
NOTE: Take a look at the image above and make sure the microphone that is set as your Windows 7 default option is actually the right one you are trying to use. As you can see from this image, there are multiple microphones connected (or used to be connected) to this system and a program like Skype could be trying to use the “6 – USB Audio Device” instead of the default one with the green checkmark, “7 – USB Audio Device“.
How To Change Your Default Microphone:
- Go to “Start > Control Panel“
- Click on “Hardware and Sound > Sound > Manage audio devices“
- When the dialog box appears, click on the “Recording” tab
- Right-click on the microphone device you wish to use and select the “Set as Default Device” option
Step #4 – Check Your Software Application Settings
If your microphone is not working in a specific software program (like Skype, etc.) but is working in other applications, then make sure your mic is selected in the “preferences”, “tools” or “options” menu (it will differ depending on the program you are using). This might sound stupid, but updating software can sometimes cause conflicts or problems with your settings, even though the software SHOULD recognize it’s own settings and save them while updating to the recent version.
Step #5 – Double-Check the Microphone “Mute” Option
Well, technically this should have been ruled out before trying to fix your microphone but are you sure your mute button is not on? It’s a “duh” moment, but we all have them.
If you have followed the steps above, then your microphone should now be working. If not, then you probably have come to the conclusion through following the steps above that your microphone is bad. In that case, you should be looking for your keys right now to head out to the nearest electronics store for a new one 🙂

